A few weeks ago i published a very popular post featuring an Amazing jQuery Image Zoom For Blogger.That effect allowed you to display an in dept zoom in a container beside images.In this post we have the same in dept zoom but this time it appears within the image in whats called inner zoom.So if you uploaded an image to your blog that’s displayed 200×200 pixels the zoom appears within that space.Lets look at the demo so you can try it out.

Another really cool jQuery zoom with thanks to Professor Cloud, for WordPress and other platforms you can download the effect there.
Video Tutorial – View The Video Tutorial At The Bottom Of The Post For Extra Help.
Add jQuery Inner Zoom Effect To Blogger
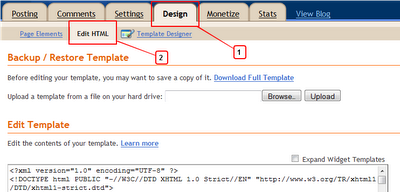
Step 1. In Your Blogger Dashboard Click Design > Edit Html

Step 2. Find the following piece of code in your blogs Html : (Click Ctrl and F for a search bar to help find the code – More Info)
</head>
Step 3. Copy and Paste the following code Directly Above / Before </head>
Note – If you previously added jQuery To Your Template You Can Remove The Line Highlighted.
<script src=’https://ajax.googleapis.com/ajax/libs/jquery/1.6.1/jquery.min.js’ type=’text/javascript’/>
<script src=’http://suyb.googlecode.com/files/cloud-zoom.1.0.2.js’ type=’text/javascript’/>
OK thats the jQuery scripts added and as it’s an inner zoom we dont need any Css so your ready to add the zoom to your pictures.
Adding The Zoom Effect To Images
To do this we add this snippet of code to your images.
class=”cloud-zoom” rel=”softFocus: true, position:’inside’, smoothMove:2″
So in a regular image it would look like this :
<a class=”cloud-zoom” rel=”softFocus: true, position:’inside’, smoothMove:2″ href=”http://4.bp.blogspot.com/-6-Dg93s2vpc/TeOAlSCdhkI/AAAAAAAAEL0/mznIqK7yRag/s1600/large-zoom-example.jpg”><img src=”http://4.bp.blogspot.com/-6-Dg93s2vpc/TeOAlSCdhkI/AAAAAAAAEL0/mznIqK7yRag/s640/large-zoom-example.jpg”/></a>
In images uploaded directly to Blogger it would look something like this :
<div class=”separator” style=”clear: both; text-align: center;”>
<a class=”cloud-zoom” rel=”softFocus: true, position:’inside’, smoothMove:2″ href=”http://4.bp.blogspot.com/-6-Dg93s2vpc/TeOAlSCdhkI/AAAAAAAAEL0/mznIqK7yRag/s1600/large-zoom-example.jpg” imageanchor=”1″ =><img border=”0″ height=”409″ src=”http://4.bp.blogspot.com/-6-Dg93s2vpc/TeOAlSCdhkI/AAAAAAAAEL0/mznIqK7yRag/s640/large-zoom-example.jpg” width=”640″ /></a></div>
Easy, Make sure you have the script in the right place, If you already have jQuery in your template remove the line shown and add the snippet to your image code.
Video Tutorial
Thanks again goes to Professor Cloud, make sure to also check out the Container jQuery Zoom and more of our jQuery Tips And Tricks.
Drop Your Comments And Questions Below.


