Posted : Tuesday, May 10, 2011 | Post Author : Paul Crowe | 56 comments
Many of the latest posts have been looking at Css effects and Image effects so in this post we will continue with the images but bring some jQuery into the mix.If your a beginner thinking whats he talking about don’t worry we will have all the steps set up for simple copy and paste.The effect we will achieve in this post is very cool.When you add an image to your blog you can allow users to hover over that image and a larger version appears.Users can then move the cursor around the small image and see it zoomed.The demo below will show you exactly how it works.


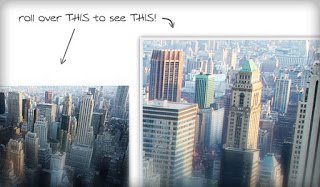
How cool is that ? This is great for blogs that use lots of images especially photography blogs with high quality in dept images.You can have a medium sized image in your blog post but still let people get a close look without having to click through.Credit and thanks for the original code Goes To the awesome Css Globe Check Them Out.
Inner Zoom – We have since published a post with the same zoom effect but instead of it appearing in a container it appears within the image – jQuery Inner Image Zoom Effect.
Add jQuery Image Zoom To Your Blogger Blog
OK there are a number of things we are looking for.Obviously the original picture will need to be fairly large, the placeholder for the zoom image is 600×400 so anything from 500px up (Beginners – if you go to the demo and hover, you want the original picture to be as big or bigger than the box holding the zoomed image, You can get more details in the video tutorial).We then add the full size image and re sized image to the post.
Add The Css And Scripts
Step 1. In your Blogger Dashboard Click Design > Edit Html
Step 2. Find the following piece of code in your blogs Html : (Click Ctrl and F for a search bar to help find the code – More Info)
]]></b:skin>
Step 3. Copy And Paste The Following Code Directly Above ]]></b:skin>
#easy_zoom{
width:600px;
height:400px;
border:5px solid #eee;
background:#fff;
color:#333;
position:fixed;
top:35px;left:50%;overflow:hidden;
-moz-box-shadow:0 0 10px #555;
-webkit-box-shadow:0 0 10px #555;
box-shadow:0 0 10px #555;
/* vertical and horizontal alignment used for preloader text */
line-height:400px;
text-align:center;
}
Important – You may need to change the highlighted code above to suit your template.This sets the distance of the zoom image from the side of the page, see more on this in the Video Tutorial.
Step 4. Now Find the following piece of code in your blogs Html : (Click Ctrl and F for a search bar to help find the code – More Info)
</head>
Step 5. Copy and paste the following piece of code Directly Above </head>
Important – The code highlighted in yellow is the main jQuery script, if you already have jQuery in your template don’t add this.
<script src=’https://ajax.googleapis.com/ajax/libs/jquery/1.4.4/jquery.min.js’ type=’text/javascript’/><script src=’http://suyb.googlecode.com/files/easyzoom.js’ type=’text/javascript’/>
<script type=’text/javascript’>
$().ready(function() {
$(‘a.zoom’).each(function(i) {
$(this).easyZoom();
});
});
</script>
Step 6. Save Your Template, that’s the jQuery and Css added now you just gotta add your images.
Adding The Image To Your Posts
When you upload a large image to Blogger it will often be re-sized to fit your posts.This is actually perfect as the re-sized image will be in your posts but the zoom will use the original size.The image code you upload will look as below and you simply add class=”zoom” as highlighted :
<div class=”separator” style=”clear: both; text-align: center;”>
<a class=”zoom” href=”http://2.bp.blogspot.com/-DPjvBLRp3XI/Tcl3KDrv0dI/AAAAAAAADwY/lyta4cvd9r0/s1600/large.jpg” imageanchor=”1″ style=”margin-left: 1em; margin-right: 1em;”><img border=”0″ height=”205″ src=”http://2.bp.blogspot.com/-DPjvBLRp3XI/Tcl3KDrv0dI/AAAAAAAADwY/lyta4cvd9r0/s320/large.jpg” width=”320″ /></a></div>
You can see more on this in the video tutorial below.
Video Tutorial
Drop Your Comments And Questions Below.
56 comments:
Awesome effect thanks for the share its perfect for one of my blogs.
ReplyDelete
So you need to do this for each post? Rather than set it up for all posts? (I’m reading your blog post on an iPad but edit my blog on a pc, else I woul try rather than ask 🙂
ReplyDelete
Sorry – when I posted the comment the refresh actually showed me the video that it hadn’t previously loaded, question answered! Thanks
ReplyDelete
GREAT tute, thank you..it even worked for me lol
ReplyDelete
I was thinking, it would be cool if you posted something about zooming, when u posted your Floating pic post last time. U read my mind 😀
ReplyDelete
@ Benta – It’s quiet simple isn’t it 🙂
@ Pink Princess – I had a quick look at your blog and it looks great, the tea pot as a cursor kinda caught me…very cute 🙂
@ Samiul – That’s my day job, reading minds ! So no bad thoughts.Glad you liked it .. and isn’t it so simple as well perfect for blogger.
ReplyDelete
Replies
sir,i am having 2 problems:-
1.first in the updated blogger interface,in the template tab,in the dynamic view tab,edit html is not working.so i switched to old blogger interface.
in this interface when i try to put in the changes and save template 2.)it says “More than one widget was found with id: Navbar1. Widget IDs should be unique.
please reply.
Delete
This is just simply awesome…. It will come handy to display infographics on my blog.
Thanks for the TuT Paul 🙂
ReplyDelete
wanna ask, how can we apply it to all images without having to do it manually to every single image? Thanks! =D
ReplyDelete
@ Ahmad Nuzul – Don’t be so lazy it takes 5 seconds to add the class :D.It can be done but i would have to change the script and it would confuse beginners having two scripts.
ReplyDelete
Excellent. Great work!!! Do it more!!! Next time give me a whole picture mode.
ReplyDelete
Hi Paul, thank you I really love this effect. From the ‘mistake’ I also got brave enough to move it down, and make it biggerM. Not quite HTML programming I know, but I’m chuffed, thanks for the instructions 🙂
ReplyDelete
Owh ok, Thanks for the reply, just love your posts =)
ReplyDelete
v.cool
So I can chose which images have the effect by editing the class=”zoom?
because I wouldn’t want that effect on all of my pics.
Especially my profile pic j/k
ReplyDelete
Great script but it only appears to work on one image – all the other images simply show a ‘white box’. IF I click the actual post and blogger opens the post then the image works but from the ‘home’ page only one image actually shows the zoomed image – the other images that I added the class simply open a white box . . . any ideas?
ReplyDelete
@ Annon – Did you add the class to each of the images ?
ReplyDelete
yea I’m facing the same problem.
I did add the class to each image, but if I have 2 image or more in the same post, only the last picture will have this effect.
ReplyDelete
@ Andy @ Anon – I see the problem and I’m looking into it now, if i find a fix i will let you know.
ReplyDelete
Hi, I would like to know if it is possible to turn the zoom rectangle box smaller, and how to do it
ReplyDelete
I guess I’ve found it!
ReplyDelete
Is it possible to change the hand cursor over the image? I would like to have like a big “+” sing or a small square,or a circle, but specifically over the image. Would you tell me how to do that?
Thanks
ReplyDelete
@ Magia – I’m afraid You would need to edit the script to do this.
ReplyDelete
Any chance you have figured out the issues Anon and Andy were experiencing?
ReplyDelete
@ John P, Andy, Anonymous – You will be glad to know I have updated the code so it will now work on all images in your posts.It is updated in the post, to update it in your blog replace this (May be in there more than once)
<script type=’text/javascript’>
jQuery(function($){
$(‘a.zoom’).easyZoom();
});
</script>
With this :
<script type=’text/javascript’>
$().ready(function() {
$(‘a.zoom’).each(function(i) {
$(this).easyZoom();
});
});
</script>
If you have any more trouble let me know.
ReplyDelete
Replies
hi Paul Crowe
i am looking this effect for each post thumbnail.i need autocratically zoom
effect for each post. is it possible .Waiting for your kind reply
Delete
hi there. can someone help me out with this script? for some reason the zoomed image is off the screen ive tried messing around with the script but no luck. is it because my image is too large? www.swag-my.blogspot.com
ReplyDelete
@ Swag – Look at the code highlighted in step 3 and the instructions that go with it.You may need to move the position of the zoom container.I have a new zoom effect ready that zooms within the image, will be posted over the weekend.Maybe that will work better for you if you wanna wait.
ReplyDelete
hats off sir great work really helped me best luck………….
ReplyDelete
set class ‘zoom’ to all img elements by :
pasting this code under the head –>script type=’text/javascript’
document.getElementsByTagName(“img”).className += “zoom”;
/script
ReplyDelete
well script is having in problem in my blog site where i am using the script in first time it works fine after implenting it, but after few days the zooming effect on all images stops, this is what has been happening with my site images, zoom effect not working
what could be the reason behind the effect stops working after few days,?? is thr problem with with the code. what to do now, please reply soon
ReplyDelete
@ Raj – It worked at first ? Have you added other scripts since they could be effecting it.
ReplyDelete
tq so much! i love this. 🙂
ReplyDelete
that’s so kind of you to share all these nice things!
ReplyDelete
i followed your instructions but it didn’t work for me. maybe i did something wrong, or it’s about some settings on my computer or browser. i don’t know. i’m not really familiar with this kind of stuff. anyway, i’m really impressed by your generosity. you help a lot of people. 🙂
ReplyDelete
hello Admin! me again. now it works for me. i was indeed doing something wrong. i guess i have to add: class=”zoom” everytime i post an image. thanks a lot! 🙂
ReplyDelete
It’s first time worked all image but since a week it’s problem not works for all image. Just zoom one image only….how to fix it pls give me the write solution ASAP
thanks ………
ReplyDelete
It’s really great Script but now script is having in problem in my blog site where i am using the script in first time it works fine after implenting it, but after few days the zooming effect on all images stops, zoom effect not working.
what could be the reason behind the effect stops working after few days,?? how to fix it now , please reply soon
ReplyDelete
Hi umm….. the zoom effect dosen’t work on my blog :O.
ReplyDelete
Finally i found something thatworks wonderfully thank you!!!
ReplyDelete
Thanks so much, it is very help to make perfect of my blog.
ReplyDelete
Thank you so much! 🙂
ReplyDelete
It’s absolutely great, bro. Many many thanks.
ReplyDelete
hi paul i face same problem
well script is having in problem in my blog site where i am using the script in first time it works fine after implenting it, but after few days the zooming effect on all images stops, this is what has been happening with my site images, zoom effect not working
and yes i add new code thr is some thing miss code i guess plz help me out
here is my blog adress http://onestepdownload.blogspot.in
thx in advance 🙂 plz help me out
ReplyDelete
Replies
Babbu – Make sure you dont have the main jquery script in your template more than once.Check above the closing head tag ( < /head > without the spaces.
Delete
Thank you very much, it is a really cool effect.
But i am actually facing some problems, for some reason it ain’t working for me, i did everything right and still.
Can you please help?
ReplyDelete
goooooooooood
ReplyDelete
Thank you so much for doing this demo and making it so super easy to follow. I look forward to looking around on your blog for more great info. Thank YOU!!! =)
ReplyDelete
Oh….I forgot to ask – is there a way to increase the amount of magnification for the zoom in? Thanks again.
ReplyDelete
Is there a way to increase the amount of magnification for the zoom in?
ReplyDelete
Its great. Worked fine for me.
ReplyDelete
Thanks for giving nice information in very easy steps and your viedeo is very helpful.
ReplyDelete
Cool! Just do for my blog: http://www.downspaces.com/
Thanks a lot!
ReplyDelete
This is awesome!! Only wish there were a way to not have to code the zoom into each post 😛
ReplyDelete
Jesus, i keep coming back to this site. Thanks alot again !
ReplyDelete
Thanks for every other magnificent article.
Where else may just anybody get that type of
information in such a perfect approach of writing?
I have a presentation subsequent week, and I am on the look for such information.
my blog :: binocular reviews (http://www.fotoloid.com)
ReplyDelete
Thanks Paul. Its nice zoom effect
ReplyDelete