


One WordPress feature i really like that is not available on Blogger is last post, next post links at the foot of the page with the actual titles of the posts they link to. On Blogger we have got Newer Post, Older Post links but the title of the post is not shown. I feel these links would get a super increase in clicks if the titles were connected. With simply “Newer” and “Older” people don’t know what they are clicking the titles will catch the eye and thus entice more clicks. The knock on effect of this will see more page views that will lead to more return visitors, subscribers and followers.
I said this feature was not available on Blogger, that is until now. A few people have created hacks to add the titles to the older, newer links including myself but every time it had errors. However one hack I have seen does the job perfectly.
The awesome “Yet Another Blogger Tips Blog” i stumbled upon recently has some very cool Blogger hacks and you need to check it out. This tutorial comes from the author of YABTB with the username “MS-potilas”.Check out the screenshot below, you can see a demo on this blog by scrolling to the bottom of this post below the comments.
Add Post Titles To Older Post Newer Post Links On Your Blog
Remember Always Back Up Your Template Before You Make Changes – How To Back Up A Blogger Template
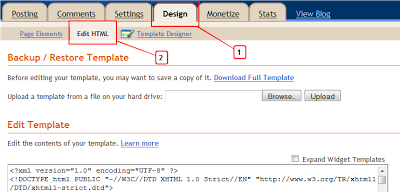
Step 1. In Your Blogger Dashboard Click Design > Edit Html
Step 2. – Adding the jQuery, skip this if you previously added jQuery to your template Find the following piece of code in your blogs Html : (Click Ctrl and F for a search bar to help find the code – How To Find Code In Blogger Template Template)
</head>
Step 3. Copy and Paste the following code Directly Above / Before </head>
<script src='http://code.jquery.com/jquery-latest.js' type='text/javascript'/>
Step 4. Find the following piece of code in your blogs Html : (Click Ctrl and F for a search bar to help find the code – How To Find Code In Blogger Template Template)
</body>
Step 5. Now Copy And Paste This Code Directly Above / Before </body>
<!--Start post title code http://www.spiceupyourblog.com -->
<b:if cond='data:blog.pageType == "item"'>
<script type='text/javascript'>
// Post titles to Older Post and Newer Post links (without stats skew)
// by MS-potilas 2012. See http://yabtb.blogspot.com/2012/01/add-post-titles-to-older-and-newer-post.html
//<![CDATA[
var urlToNavTitle = {};
function getTitlesForNav(json) {
for(var i=0 ; i < json.feed.entry.length ; i++) {
var entry = json.feed.entry[i];
var href = "";
for (var k=0; k<entry.link.length; k++) {
if (entry.link[k].rel == 'alternate') {
href = entry.link[k].href;
break;
}
}
if(href!="") urlToNavTitle[href]=entry.title.$t;
}
}
document.write('<script type="text/javascript" src="http://'+window.location.hostname+'/feeds/posts/summary?redirect=false&max-results=500&alt=json-in-script&callback=getTitlesForNav"></'+'script>');
function urlToPseudoTitle(href) {
var title=href.match(/\/([^\/_]+)(_.*)?\.html/);
if(title) {
title=title[1].replace(/-/g," ");
title=title[0].toUpperCase() + title.slice(1);
if(title.length > 28) title=title.replace(/ [^ ]+$/, "...")
}
return title;
}
$(window).load(function() {
window.setTimeout(function() {
var href = $("a.blog-pager-newer-link").attr("href");
if(href) {
href = href.replace(/\.blogspot\.[^/]+\//, ".blogspot.com/");
var title=urlToNavTitle[href];
if(!title) title=urlToPseudoTitle(href);
if(title) $("a.blog-pager-newer-link").html("<< Newer Post<br />" + title);
}
href = $("a.blog-pager-older-link").attr("href");
if(href) {
href = href.replace(/\.blogspot\.[^/]+\//, ".blogspot.com/");
var title=urlToNavTitle[href];
if(!title) title=urlToPseudoTitle(href);
if(title) $("a.blog-pager-older-link").html("Older Post >><br />" + title);
}
}, 500);
});
//]]>
</script>
</b:if><a href="http://www.spiceupyourblog.com/">Gadgets By Spice Up Your Blog</a><!--End post title code http://www.spiceupyourblog.com -->
Step 5. Find the following piece of code in your blogs Html : (Click Ctrl and F for a search bar to help find the code – How To Find Code In Blogger Template Template)

]]></b:skin>
Step 6. Now Copy And Paste This Code Directly Above / Before ]]></b:skin>
.blog-pager-newer-link {background-color:transparent !important;padding: 0 !important;}
.blog-pager-older-link {background-color:transparent !important;padding: 0 !important;}
#blog-pager-newer-link {padding:5px;font-size:90%;width:200px;text-align:left;}
#blog-pager-older-link {padding:5px;font-size:90%;width:200px;text-align:right;}
Step 7. Save your template.
I think this is an awesome addition to any blog and will keep visitors on your blog longer looking through your archive. I intend on adding another post with a tutorial on having the next post and previous post titles at the bottom of current posts below the last line of text or at the top before the first line of text. Make sure to check out more of our Blogger Tips.
Drop Your Comments And Questions Below.