If you look at the bottom of the posts in many blogs you will see they finish with a signature.I think the signature looks great and adds a bit of style to the posts.These signatures are very easy to create and add to your blog and in this post i will show you how.You can actually use a small pad to write you signature or pick from one of hundreds of pre-made signatures.I suggest using the pre-made signature, using the pad to create your actual signature is almost imposable.
This Post Has Been Updated On 8th June 2012.
Create the signature
I’m going to create another signature and walk you trough the steps as i do.
Step 1. Go to My Live Signature and click ‘Start Now’ you don’t need to register.
Step 2. You have 2 free options here, choose to use the wizard as i did or be brave and try to write one.
Write in your name as i did below :
Choose the font you want to use from the hundreds they have and click next as below :
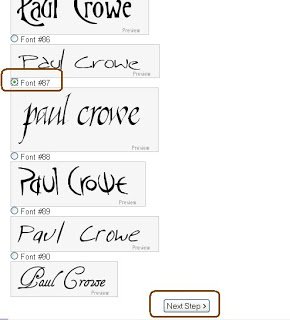
Follow the steps to design the signature :
-You now choose the size i choose size 3.
-Select the color, i choose a transparent background.
-Choose the angle slant, I choose 2.
Now your signature is ready, click on ‘Want to use this signature?’ as below :
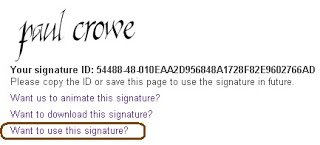
Now choose ‘Generate html code’ you will be provided with the code :
This is the code for my new signature :
<a href=”http://www.mylivesignature.com” target=”_blank”><img src=”http://signatures.mylivesignature.com/54488/48/010EAA2D956848A1728F82E9602766AD.png” style=”border: 0 !important; background: transparent;”/></a>
And this is the new signature :
If you know how to upload the image to Blogger or Photobucket or any image hosting you may want to do that, if not don’t worry we will use it as it is.
We only want the image and we don’t want the image to be a link back to My live signature so you can remove the code in blue and keep the code in yellow :
(If your not sure how just change www.mylivesignature.com to the address of your blog)
<a href=”http://www.mylivesignature.com” target=”_blank”><img src=”http://signatures.mylivesignature.com/54488/48/010EAA2D956848A1728F82E9602766AD.png” style=”border: 0 !important; background: transparent;”/></a>
Add the signature to your blog
There are two ways to add the signature to your blog the first way is the easiest but it wont be in you previous posts.The second way adds it directly to your template.
First way to add the signature to your blog.
.
Step 1. In the new Blogger dashboard click the drop down menu for your blog > Choose settings > On the left of the settings page choose ‘Posts And Comments’.
Step 2. At the top of the Page you will see ‘Post Template’ paste in the code and save:
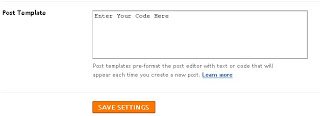
Now every time you you go to write a post the signature will be already in the post.
Second way to add the signature to your blog.
Step 1. In Your (New Design) Blogger Dashboard Click The Drop Down Menu For Your Blog > Choose Template > Then Edit Html > Now Proceed > Tick The Expand Widget Templates Box as shown in the video Below :
Find the following code in your blogs html :
(Click ‘CTRL and F’ for a search bar to find the code)
<data:post.body/>
Paste the code for your signature Directly Below or After <data:post.body/>
Note : If <data:post.body/> is in your template twice place it after the second one.
That is extremely cool! Helps make your blog posts more personal.
ReplyDelete
Thanks Tom,
I have used it for as long as i can remember and it does add somthing unique to your blog.
There is a way to upload your signature but (for me anyway) it wont be as cool.
Paul.
ReplyDelete
This is a great idea.
Love it.
I already have in my template formatting ‘Currently Reading:’ then I just add the latest book I’m reviewing to it. I assume that you can actually use the signature creator to make any kind of message, like ‘Follow Me’ and have it link back to your Twitter page etc.
I bet there are many uses for this cool app.
Thanks so much for the great info– as usual!
And I really appreciate the directions and graphics on how to add stuff to your template for convenience. Awesome!
ReplyDelete
Thanks so much T,
I had a look at your blog and you definatly picked a signature that suits both you and the style of the blog, i bet you looked at every signature on the site 😀
Im honored to be mentioned in your latest post, having an effect on people and helping them do somthing they otherwise wouldnt try is why i give so much time to this.
It’s Great fun as well..
Paul.
ReplyDelete
Actually on your other point of using the signature in differant places i am going to write a post on using the signature maker to make a header for your blog.
It would be such an easy way to make a cool header.
Paul.
ReplyDelete
Hi Paul!
I tried it and it works! I just need to go fix the color of my text now though. I hope you don’t mind but I have added a post with a link to your blog as well. Great JoB!!
Regard
Ronel
ReplyDelete
Thanks Ronel,
Im always honored to be mentioned by a fellow Blogger, Im going tp head over to you blog and see what your new signature looks like..
Paul.
ReplyDelete
sir your blog tricks are really cool. I always find something interesting in your blog. I have added the image changing trick on mouse roll over. but it’s not working. i have used that trick for my feedburner icon in the header. you can check in my blog http://techgoss.blogspot.com please tell me the correction.
ReplyDelete
Hi Suraj,
Is the code you use for the image in the header of your blog in your template html ?
This could be the problem, i will try it on a test blog and get back to you again,
Paul.
ReplyDelete
its great..i have finally made a sinature ..and it looks pretty good..thank u
ReplyDelete
Thank you so much! I’ve got my signiture, but how do I center it in the post instead of it aligning to the left?
ReplyDelete
@ Miss B – Just add the center attribute to the code.So add it like this : <center>Signature-Code-Here</center>
ReplyDelete
Wow! this is awesome…
I’ll try to make my own sig.
ReplyDelete
IT’S AWESOME!VERY INTERESTING READING!
ReplyDelete
I like this post, enjoyed this one appreciate it for putting up.
ReplyDelete
Yeah!Thanks again, because of your blog I DID IT!:)
ReplyDelete
hey i paul i think this website (My Live Signature ) have problem
ReplyDelete
Thanks.
ReplyDelete
Thanks for the very detailed post I just followed it and my new siggy looks great!
ReplyDelete
Fabulous instructions… they are so helpful. Thanks!
ReplyDelete
Wow!!! Your smart. That is awesome. God bless.
ReplyDelete
How do I remove the white background? It doesnt blend in my green background. i get my signature inside a white box if i use it. Thanks.
ReplyDelete
Thanks Paul, it’s working on my blog.
ReplyDelete
This is SO brilliant. I had twice in my html template thingy and i posted the html code after the second one but it did not appear. I posted it back after the first and voila! This is amazing. Thanks so much for it 🙂
ReplyDelete
Hi I love this idea and use it on my blog. I was wondering if there is any way to put my signature AFTER people click on “read more” ?
right now my signature appears before every single “read more” link. Is there a way to change this? thank you
ReplyDelete
Thank you SO MUCH! I had been to 2 other sites and found you finally. Very easy and looks great!
Jennifer
goosebumpfactor.blogspot.com
ReplyDelete
perfect, perfect, PERFECT! so easy and simple!
ReplyDelete
I see this post was written a long time ago but I’d appreciate it if you’d have the time to help me out anyway, hopefully!
I’m trying to add my signature the second way so that it’ll apply to my previous posts but when searching for the code in the htmls it says “search not found” and I’ve tried to look for it manually without result, what does this mean?
Thanks in advance!
ReplyDelete
if for at wordprees how to set it up
ReplyDelete
can you tell me how to add coloured signature plz.
ReplyDelete
Thank you so much for all the great info! I ♥ my new signature and by reading through other comments I was also able to center it! Hope you are having a wonderful Memorial Week-end! ~ Judy
ReplyDelete
I cannot find any of the codes above to paste the picture of html. Please help.
ReplyDelete
I copied the code and saved it but it didn’t appear on my blog. Please help. Thanks.
ReplyDelete
Thank you so very much for this tutorial. I have been looking for an easy way to add a signature. I tried both ways explained above, but it still does not appear. Can you assist, please? thx
ReplyDelete
thanks for sharing this. I’ve tried the 2nd way – edit HTML but my signature does not appear. I’ve even tried with new posts, but nothing shows up. Any clues? Thanks.
ReplyDelete
Okay, the reason my name is Skerrymalas is because I have a Blog but it is about a National Geographic’s Game, Animal Jam. Skerrymalas is just my user. I’m STILL trying t get a signature and my Mom won’t help. She says I’m the computer wiz of the family. Gee, thanks! That helps a lot, mom. So.. whenever I copy and paste the signature just like you said, (you should be warned I’m not very good with directions) it just comes up with the HTML code on my post. ARRG! Help???
~Skerrymalas (My user on Animal Jam)
ReplyDelete
I like this tutorial very helpful and that adds a lil twist on a blog.
Thanks Paul!
http://theyellowbulb.blogspot.com
ReplyDelete
Oh cool!
ReplyDelete
Hi Paul…I love the personalizing my blog – however it is affixed on the top right corner of the post rather than bottom of the post. Help! Thanks 🙂
ReplyDelete
I’ve been doing mine manually for months! I didn’t know how to automatically do it ’till now, thanks to this post. 🙂 So informative! 🙂 Keep up the great work. You’re helping a lot of bloggers. Thank you! 🙂
ReplyDelete
Mine is not showing up as transparent which is driving me nuts…… I have a cream coloured background and I HATE the white box….
ReplyDelete
Replies
Nikki you have to choose transparent during the process, I’m not sure at which stage but try again and look out for it.
Delete
Paul, what a great post! I look at other blogs and always wonder how they did certain things. I am new to blogging and was eager to try this and I had some success although my signature appears in the center at the bottom of the post and the last line of my post comes AFTER my signature. Any ideas how to fix?
Tania
Mrs Poultney’s Ponderings
ReplyDelete
Replies
I took a look and it seems like you sorted it out.
Delete
Hi Paul I am having the same issue right now how do i fix this please
Delete
It’s really nice bro…It really nice on my blog 😀
http://anonymouseverywhere.blogspot.in/
ReplyDelete
Incredibly helpful, thank you!!!
ReplyDelete
i tried it but doest work got a error message can you please help me
Your HTML cannot be accepted: Closing tag has no matching opening tag: A
ReplyDelete
I did every thing you said, but my signature isn’t showing up…
ReplyDelete
This is awesome! Thank you! So easy and fun as well. Many Thanks
ReplyDelete
how to align it to right ??
ReplyDelete
Replies
Add your image between these div tags :
<div style=”text-align: right;”>
YOUR-SIGNATURE-IMAGE-HERE
</div>
Delete
Awesome! All your tips area really awesome!
ReplyDelete
Thank you so much for posting this. I love my new signature! Thanks so much for taking the time to teach us less smarties how to get things done. 🙂
ReplyDelete
Thanks, Paul! Got it to work. I think it was staying up all night. Yep, lack of sleep. That’s what I’m going with and I’m sticking to it ;). If you would like to see the post about you, please head over to http://ironiclee.blogspot.com
You are truly the best.
Thanks for all of your hard work and excellent explanations.
Best Regards,
Lee Jenna Tyler
ReplyDelete
The fonts in it don’t suite me that much.But I still thank you for giving help.I saw comments from other people.Even though,I don’t have a blog at all.I actually wanted a”hand-written signature”.Thanks!!!!!!!!!!
ReplyDelete
It’s superb. Thank you for this Signature post.
I will definitely try it out.
ReplyDelete
Thank’s 4 signature post…
ReplyDelete
Thanks…4 the tips
ReplyDelete
I had a thought a few days ago to add a signature on my blog post because it makes the post more believable.
ReplyDelete
This whole experience has me completley perplexed. There are so many things I want to do and spending 2 hours on creating a signature wasnt one of them. I think your instructions are correct, however, the website to make the signature has changed. Every time I would go to get the code, a new window would pop up and intercept this task! I am so annoyed. After trying 9 times, I am giving up, without getting a (expletive) signature 🙁
ReplyDelete
I am definitely impressed. My OWN signature …. well it sucks. And it’s quite lame LOL Thank you very much =D
ReplyDelete
nice informative blog
ReplyDelete
I like this tutorial very helpful.You have shared such a nice info.
ReplyDelete
I like the presentation of content on your blog, the layout and theme is fascinating too.
ReplyDelete
very nice thank you i am looking for this.
ReplyDelete
Thanks to you I have used my signature on a blog for a long time. It is on the template on the left hand side and I am currently trying to centralise it. It’s a pain having to do it each time I write a blog. I have tried html but I keep getting an error message. Thanks in anticipation for your help.
ReplyDelete
Thank you so much! Your instructions were so easy that even this technically challenged blogger could do it!
ReplyDelete
This is fabulous! I just created and added my signature without a hitch and I’m a total newbie! Thanks for the tutorial.
ReplyDelete
I’ve been asking and asking and nobody’s helped me yet..what if you have a background on your blog that is not white and the transparent graphic signiture is not displaying properly. It displays on the sidebar and not in the body of the blog. Help! Laura
Ever since I’ve had blogs this has been a problem…..I’m working on another one..you can see what I mean here…thanks, Laura
http://rhodeshousekitchen.blogspot.com/
ReplyDelete
Nice Stuff
Thanks Paul
ReplyDelete
Cool. I will use this for my blog.
Thanks!
ReplyDelete
thank u so much for this tip… i used it and actually posted it in the HTML below all the three “data post body” i could find, so now i have it in the home page as well as after each post… 🙂
ReplyDelete
Hi Paul,
Thanks for your ‘Sign’ tut.
It works fine! The only thing I pity is that it’s placed a bit far under the post.
Can I add something to the code to get it Higher?
ReplyDelete
That was so easy and really helpful. Thanks 🙂
ReplyDelete
Thanks…… !
ReplyDelete
Thank you so much for this post!
ReplyDelete
Thanks for the tip!
ReplyDelete
Nice one.very sleek
ReplyDelete
This comment has been removed by the author.
ReplyDelete
I’m using the second method, but when I search for the bit in my html it says its not there. Is there another name for it/somewhere else I can put it?
ReplyDelete
Very informative tutorial, thanks for sharing, its help a lot.:)
ReplyDelete
Awesome..all your tutorials was help me a lot.. i love the signature, but i can’t find the place to paste it , and can’t find it using CTRL F, is it doesn’t exist on my edit HTML ?
Thank you Paul, you help me a lot, i love your blog.xoxo.
ReplyDelete
sir your blog tricks are really cool. I always find something interesting in your blog. THANK YOU
ReplyDelete
Wonderful blog! I found it while surfing around on Yahoo News.
Do you have any suggestions on how to get listed in Yahoo
News? I’ve been trying for a while but I never seem to get there!
Thanks
Here is my site – monic polynomial (http://animekaijuexperiences.com/)
ReplyDelete