


When you first start your blog on blogger.com you are provided with a free URL / Web Address.When i started this blog i choose the free URL www.spiceyourblog.blogspot.com.This free URL is different to a normal URL and is called a Sub Domain, the reason it is called a sub domain is because it is part of a main domain.The main domain in question is www.blogspot.com and every blog started on blogger is given a sub domain connected to www.blogspot.com.
It is hard explain it any clearer than that, but the main thing to know is that if you bought a domain name directly from Blogger or Google you can also create a sub domain for the main domain you bought.

Lets look at an example – The domain name for this blog is www.spiceupyourblog.com and i bought this domain directly from blogger.
Last week i added a sub domain to www.spiceupyourblog.com , i wanted a unique about me page (We will look into this in a later post) so i created this sub domain :
You can see the address is in the same format as the blogspot domains :
www.xxxx.blogspot.com
www.xxxx.spiceupyourblog.com
As Sub domains are just additions to your original domain they are free.
I have used a sub domain for an about me page but the possibility’s are endless :
www.forum.spiceupyourblog.com
www.templates.spiceupyourblog.com
www.contact.spiceupyourblog.com
You could have sales pages, sign up pages, landing pages, anything you like really, you could even start a whole new blog using a sub domain.
Setting Up A Sub Domain With Blogger Bought Domains
The main reason people buy domains directly from blogger is ease of use.When you buy directly from Blogger all the work involved in connecting the new domain to your blog is done for you.For a beginner this is very important, However changing the settings of a domain bought directly from Blogger is a little tricky.
So far we have talked about buying domain names directly from blogger, of course Blogger is owned by Google so in fact you are buying from Google (You are using Enom but lets not make it too confusing).
Once you bought your domain you were given a Google Apps account, Remember ?
The first step is to go to your Google Apps account, so lets get started.
Step 1. Go To Google Apps : https://www.google.com/a/
Step 2. On the Google apps home page under the header you will see the log in option:
“Returning User ? Sign In Here” <–Click that option
Step 3. In the area provided Enter Your Domain Name and from the drop down menu choose “Manage This Domain” then click Go as shown below :
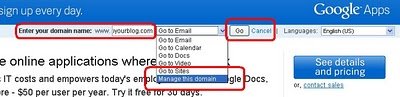
You still have to enter your username and password – This is the username associated with your Domain.You got a free Email account with your domain name this is the username.

Step 4. You are now in your Google Apps dashboard.
Click “Domain Settings” Then “Domain Names” Then “Advanced DNS Settings” as shown below :

Step 5. You are now at the last step within Google Apps, you will be provided with a username and password to log into Enom and manage the advanced settings.
Remember or copy the username and Click “Sign in to DNS console” then sign in your domain management with those details.
You will now be on a page similar to the one below :

Step 6. Click the “Edit” button for the section “Host Records” as shown below :

Step 7. For this example we are going to add a contact subdomain – The sub domain will be :
www.contact.spiceupyourblog.com
A – Click “Add New” (circled in red below) Twice to open two new sections.
B – Enter contact and www.contact (circled in blue below) into the “host name” areas.

C – Enter ghs.google.com. (circled in black below) in both “address” areas
D – Enter CNAME(Alias) (Circled in brown below) in the “Record Type” areas.

Step 8. Once your sure you have everything in the right place click save in the bottom right.
You have now created a Sub Domain and the next step is to create the blog that is going to use that sub domain.
| Remember you can get all these tips sent directly to your email and stay a step ahead.Its a quick and easy service Provided for Free by Google.Just fill in the Email form below the post. If you need extra help on this or any tutorial just leave a comment, I love comments and feedback so this Blog is Do-Follow – when you comment here it helps Your Blogs Google rank ! |
Creating A Blog And Connecting To Your Sub Domain
If you are creating a sub domain for your blog you have obviously already gone through the process of connecting a domain to blogger.Connecting your sub domain is the very same.
You create your new blog, pick a name, choose the blogspot URL – you will be changing this to your sub domain so its not important.
Once your new blog is set up go to Settings > Publishing > Switch To Advanced Settings > Enter the Sub domain you created into the area provided > Scroll to the bottom of the page and save.
As with your original domain your blogger sub domain may take a little time to connect although usually it connects within a few hours.
I hope you can follow the steps and take advantage of Sub Domains, remember if you do not renew a domain or let a domain expire you will loose the domain and all associated sub domains.
Let us know if you managed to create some Sub Domains for your blogger blog.
Did you know you could create sub domains ?